
Install and open the extension
Install Batch Video Stabilizer from Adobe Exchange, or start with the trial version. Follow the installation instructions in Adobe Creative Cloud. Restart Premiere if the panel does not appear after installation.
In Premiere, choose Window > UXP Plugins > Batch Video Stabilizer. Open the project and the sequence containing your clips.
Using an older Premiere version? The legacy CEP guide covers Premiere Pro 15.0 and higher. Its panel appears under Window > Extensions.
Run your first queue
- Save your project and open the sequence containing your footage.
- Start with Max parallel analyses set to 1. For clips without Warp Stabilizer, leave Add Warp Stabilizer if not present enabled.
- Select a few video clips in the active timeline. Click Add selected clips in the extension.
- Check the list. Remove any clip you do not want to process, or use Clear queue to rebuild it.
- Click Start Queue. The panel shows each clip’s state as it moves through analysis and stabilization.
- When finished, play the clips and inspect their crop, motion and edges before processing the rest of the sequence.
To analyze all clips in the sequence, select the video clips you need in the timeline before adding them. Selecting footage in the Project panel does not populate this queue.
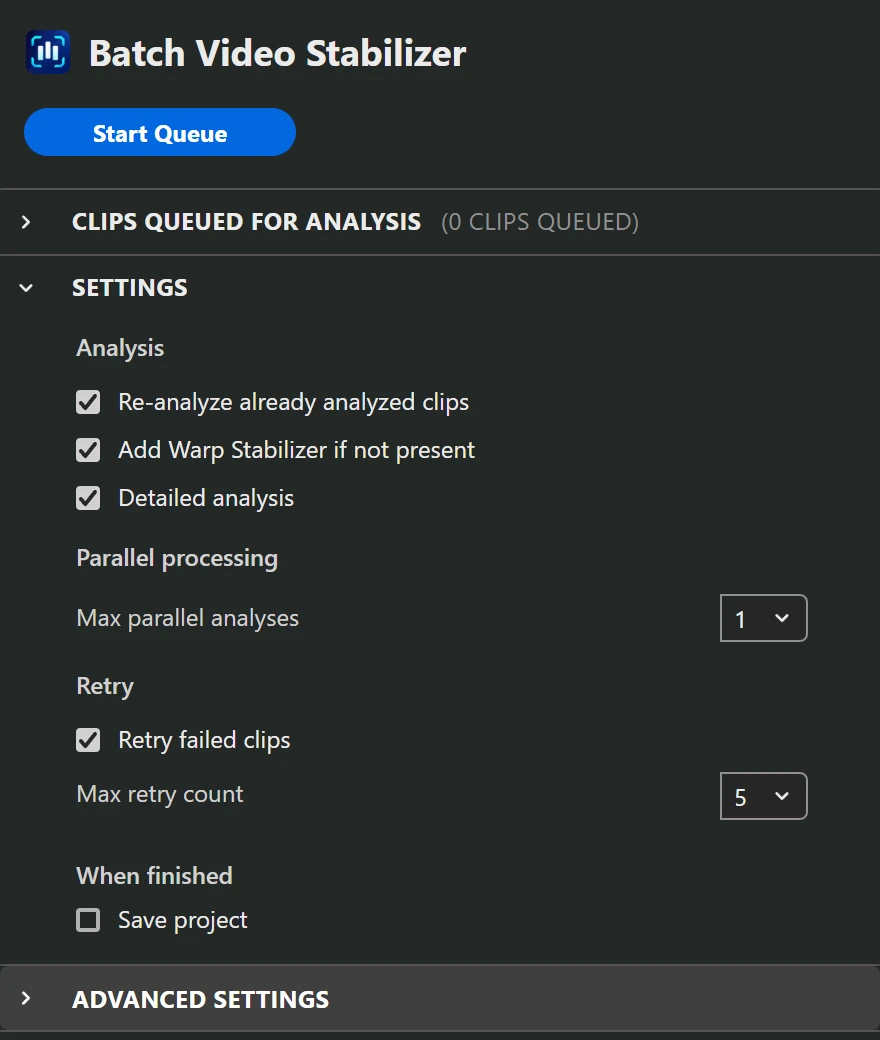
Choose what gets analyzed
| Setting | Default | Behavior |
|---|---|---|
| Re-analyze already analyzed clips | On | Runs analysis again even if a clip already has completed stabilization. Turn it off to skip completed work; clips with incomplete analysis can still be processed. |
| Add Warp Stabilizer if not present | On | Adds the effect to queued top-level clips that do not have it. Turn it off when you only want to work on existing Warp Stabilizer effects. |
| Detailed analysis | On | Requests Premiere’s more thorough analysis. This can take longer, so compare a representative shot before using it across a large batch. |
Turning off Detailed analysis does not necessarily turn off a value already enabled on an existing effect. To explicitly set it to off, use a checked custom Detailed Analysis row with the value false and enable the override for existing effects.
For a reanalysis queue, turn reanalysis on and adding Warp Stabilizer off. This targets clips that already contain the effect. See reanalyzing Warp Stabilizer after a project change.
Max parallel analyses
The default is 1; the available values are 1 to 8. A value of 1 processes clips sequentially. Higher values let Premiere analyze several clips at the same time.
Try 2 on your next small batch, then compare total queue time and Premiere’s responsiveness. Increase further only when it helps. High-resolution footage and long clips can use considerable memory, and the highest setting is not always the fastest.
Read the parallel analysis guide for a practical way to choose a value.
Retry failed clips
Retry failed clips is on by default. Max retry count defaults to 5 and accepts values from 1 to 5. This is the number of additional attempts after the first attempt.
Retries cover eligible failures. They do not resolve every problem: analysis that never starts, analysis that stops responding and failures to configure Detailed Analysis require attention. Check the clip’s message and test it directly with Warp Stabilizer in Premiere.
Pause, stop and save
- Pause Queue pauses queue processing. Native analysis that is already running in Premiere can continue.
- Continue resumes the queue.
- Stop All ends the queue run. Completed changes can remain in the timeline; review the result before starting again.
- New Queue starts a fresh queue after a run has finished.
Save project, under When finished, is off by default. Enabling it makes the extension attempt to save the project at completion. Stopping a run skips this action.
A completed queue can contain failed or skipped clips. Check the individual results. Saving the project does not render previews or export a video.
Nested sequences
In Advanced Settings, enable Recursively add nested clips to queue before adding the timeline selection. This option is available only while reanalysis is enabled. It is off by default.
The extension collects inner clips that already contain Warp Stabilizer. It does not add the effect to every inner clip. This is useful when stabilization lives inside a nest, including workflows that combine time remapping and stabilization at different nesting levels.
Custom Warp Stabilizer values
Enable Use custom settings in Advanced Settings. Check Apply beside each value you want to set. These values apply to newly added effects. To change existing Warp effects, also enable Override settings on existing Warp effects.
Both options are off by default. Unchecked rows are excluded from your custom overrides. A checked custom Detailed Analysis row takes precedence over the general checkbox when the custom settings apply.
See the Warp Stabilizer settings reference for every exposed parameter, value entry and schema refresh instructions.
Language and saved preferences
The panel supports Automatic (Premiere Pro), English, German, French, Japanese, Korean, Spanish, Simplified Chinese and Brazilian Portuguese. Set the language in Advanced Settings. Preferences are stored locally for later sessions.
Troubleshooting the queue
Frame not analyzed or new frames need analyzing
If the edit uses frames outside the analyzed range, Warp Stabilizer needs another analysis. Follow the Frame not analyzed for stabilization instructions to analyze a clip manually or queue multiple clips.
The queue stays empty
Select video clips in the active timeline, then click Add selected clips. Check that the correct sequence is open.
A clip is skipped
Check whether reanalysis is off for a clip with completed analysis, or adding the effect is off for a clip without Warp Stabilizer. Inner clips collected from nests need an existing Warp effect.
Analysis fails or does not start
Read the clip’s failure message. Run just that clip with one parallel analysis and check whether Premiere can analyze it directly. If custom values are involved, check the inputs and any version mismatch message.
Premiere becomes slow
Reduce Max parallel analyses and use a smaller test queue. Compare Detailed analysis on and off where appropriate for the footage.
For a bug report, include the extension version, UXP or CEP, Premiere version, operating system, settings, reproduction steps and the exact error message. Report it through the Batch Video Stabilizer issue tracker.